미니PC로 개발 서버 구축하기 - 5. nginx + certbot으로 SSL과 리버스프록시 적용

현재 iptime의 DDNS 서비스를 사용하고 있는데, 외부에서 개발 서버에 접근할때에 SSL이 아직 사용되지 않아 HTTP로만 접근 가능하고 HTTPS 연결은 사용할 수 없어 portainer와 같은 서비스는 사용할 수 없는 문제점이 있어 nginx로 리버스 프록시, certbot으로 SSL 발급/갱신을 적용하고자 한다.
1. 기본 세팅
볼륨 생성
Docker를 로컬에 설치한 경우
portainer 적용이 잘 되지 않아 도커 데스크탑으로 이주한 이후에 볼륨을 마운트해서 사용하려고 하니 도커 데스크탑은 기본적으로 접근가능 디렉토리가 설정이 되어 있어서 이를 GUI에서 수정해주어야 한다고 한다. 이것이 귀찮아서 처음에는 이 그냥 별도의 volume을 추가해서 사용하면 된다고 생각했다.
docker volume create nginx_data
docker volume create certbot_data
docker cp <로컬에서 보낼 파일> <컨테이너명>:<디렉토리>
Docker desktop으로 설치한 경우
근데 하다보니 certbot에서 인증서 발급 시에 호스트PC (나의 경우 미니PC)의 디렉토리에 저장되어야 하는데, 이 경우 독립된 볼륨을 사용하게 되면 불편함이 많이 생긴다. 그래서 도커 데스크탑에 접근 가능한 디렉토리를 추가하는 방법 대신 원래도 접근 가능한 디렉토리인 홈 디렉토리 하위에 볼륨 데이터를 추가하기로 했다.
/home/사용자명/docker_volumes
/nginx			/certbot
도커 네트워크
도커 네트워크를 하나 생성해서 컨테이너를 모두 해당 네트워크 그룹에 넣는다.
# 네트워크 생성
docker network connect myNetwork <container_name_or_id>
# 컨테이너를 네트워크에 연결
docker network connect myNetwork nginx-container
docker network connect myNetwork portainer
# 결과 확인
docker inspect <container_name_or_id>
그리고 이전에 설치했던 portainer의 9000 포트(http)를 개방하는 것이 좋다.
iptime 공유기 설정
- iptime DDNS 설정으로 (***.iptime.org)와 같은 DDNS를 사용할 수 있게 한다.
- 포트포워드로 80 포트(http) 443 포트 (https)를 개방하고 서버PC로 연결하여 외부에서 접속할 수 있게 한다.
외부 봇이나 해킹을 막기 위해서 국가별 접속 제한 기능을 추가하니까 아예 접속이 안되었다.
cloudflare의 네임서버가 미국으로 되어 있어 미국을 차단하면 아예 로그인이 되지 않는것으로 보이는데, 외부 도메인으로 연결한 이상 iptime의 ip 차단 기능은 무용지물이 된 것 같다. cloudflare 등의 도메인 관리 사이트에서 차단하는 기능에서 설정하면 될 것 같다.
cloudflare 설정 (도메인 설정)
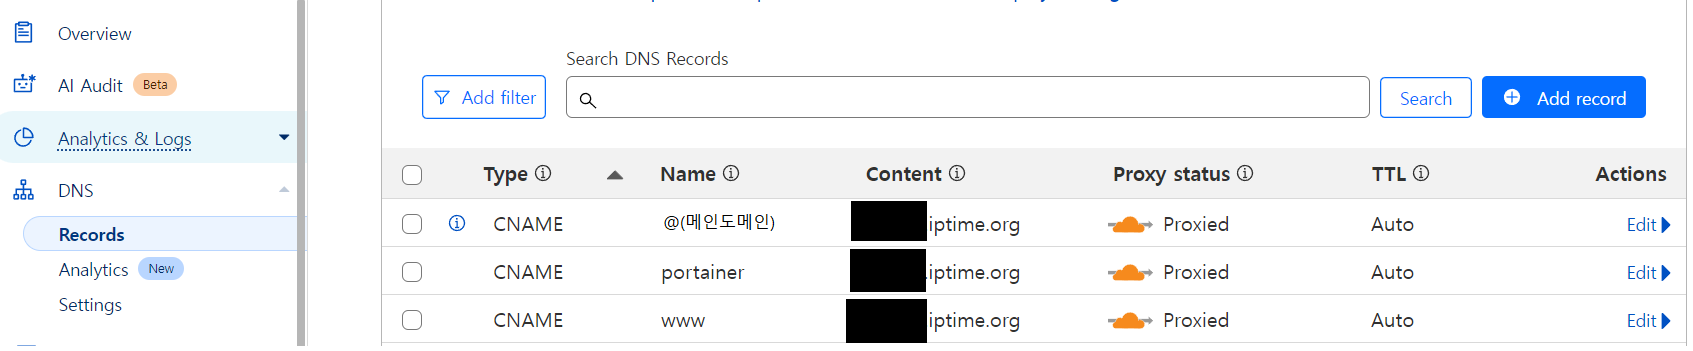
A는 정적 ip주소만 가능하기 때문에 iptime의 ddns 기능을 사용하는 나는 사용할 수 없다.
CNAME을 사용해야 하는데 이 경우 서브도메인마다 CNAME을 등록하고 SSL 인증서를 발급 받아야 하는 단점이 있다.
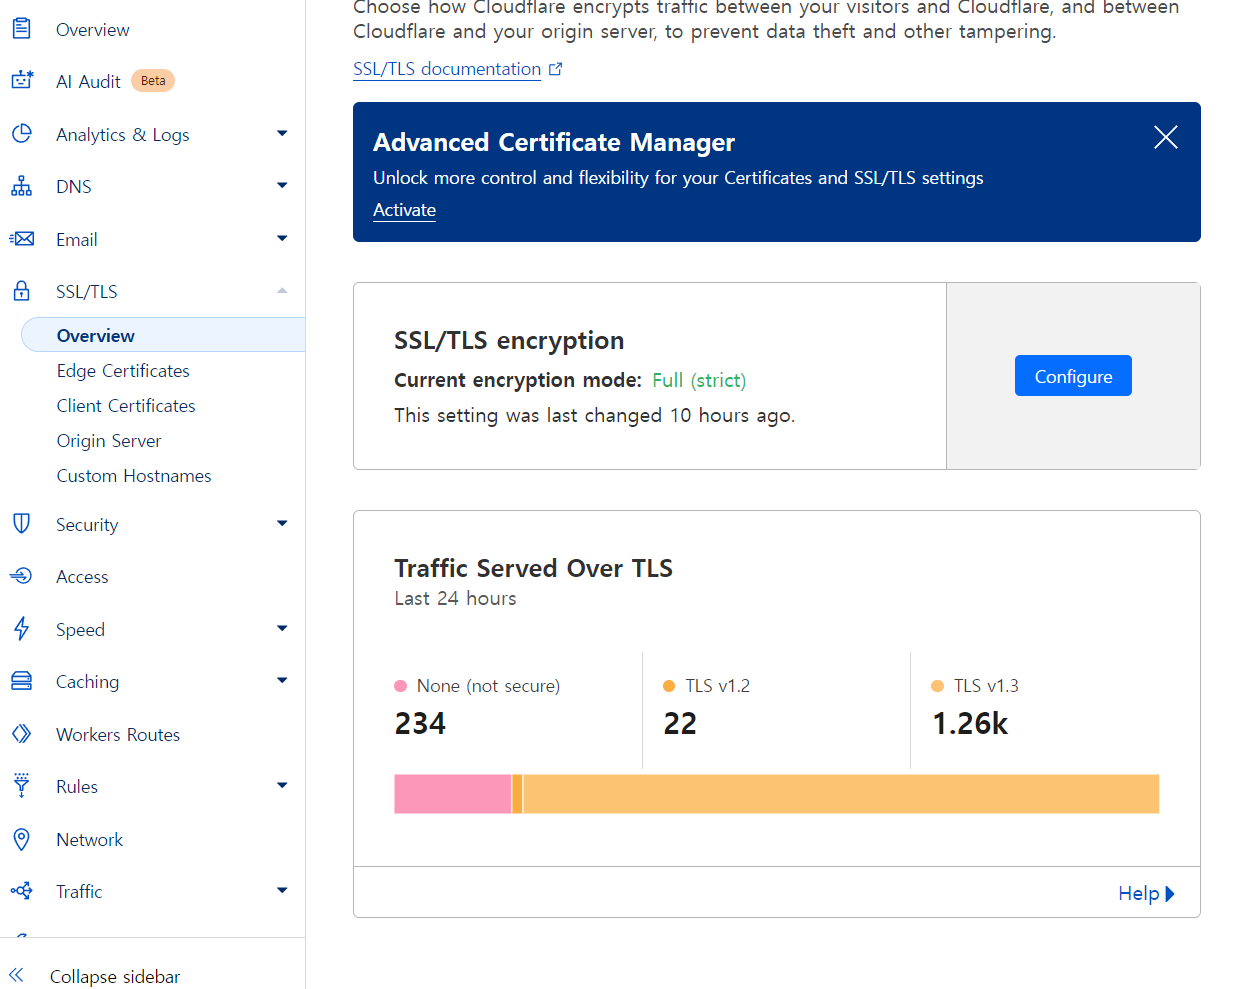
SSL/TLS 탭에서 SSL/TS encryption의 기본값이 Flexible로 되어 있는데, nginx + let's encrypt를 사용한 아래의 설정을 하게 되면 HTTP통신과 HTTPS 통신으로 계속 리다이렉션 되어 오류가 발생한다. 따라서 Full(strict)로 변경한다.
(Flexible은 클라이언트-cloudflare만 https, cloudflare-서버는 http로만 통신하는데 nginx 웹서버에서 http를 https로 리다이렉션하니 무한 리다이렉션이 발생하는 것으로 추정된다)
2. nginx
먼저 포트 80의 HTTP 통신이 가능한 nginx 웹 서버를 먼저 가동하여 certbot이 사이트 인증을 할 수 있어야 SSL 인증서를 발급받을 수 있다. 발급받은 후에 설정 파일을 수정하여 HTTPS를 추가하면 된다.
http only 웹서버
nginx.conf
user  nginx;
worker_processes  auto;
error_log  /var/log/nginx/error.log warn;
pid        /var/run/nginx.pid;
events {
    worker_connections 1024;
}

http {
    include       /etc/nginx/mime.types;
    default_type  application/octet-stream;
    sendfile        on;
    keepalive_timeout  65;

    server {
        listen 80;
        server_name yourdomain.com www.yourdomain.com; ## 도메인명

        location / {
			root /etc/nginx/html/;
			try_files $uri $uri/ =404;
            }
    }

        # 서브도메인 (API 서브도메인)
    server {
        listen 80;
        server_name portainer.yourdomain.com;

        location / {
			root /etc/nginx/html/;
			try_files $uri $uri/ =404;
            }
    }


}
mime.types 파일 생성
nginx/conf/mime.types at master · nginx/nginx
The official NGINX Open Source repository. Contribute to nginx/nginx development by creating an account on GitHub.
github.com
(너무 길어서 위의 링크로 대체)
/home/사용자명/docker_volumes/nginx/mime.types 파일 생성
nginx container 실행
docker run -d --restart=always --name nginx-container -p 80:80 -p 443:443 \
-v /home/사용자명/docker_volumes/nginx:/etc/nginx/ \
-v /home/사용자명/docker_volumes/certbot:/etc/letsencrypt \
nginx:latest
certbot 세팅/실행 후 컨테이너 실행
추후 nginx.conf 파일을 수정한 후 변경 사항을 적용하려면
docker exec -it nginx-container nginx -t  # 설정 파일 확인
docker exec -it nginx-container nginx -s reload  # 설정 재시작
을 실행하면 된다.
3. certbot
docker run -it --rm --name certbot \
	-v /home/유저명/docker_volumes/nginx:/etc/nginx \
	-v /home/유저명/docker_volumes/certbot/:/etc/letsencrypt \
	certbot/certbot:latest certonly --webroot \
	-w /etc/nginx/html/ \
	-d 도메인명
1. -v /data/nginx:/data/nginx
certbot에서 발급한 SSL 인증서를 nginx 설정에 반영하기 위해서 마운트
2. -v /data/certbot/conf:/etc/letsencrypt
발급한 인증서를 저장할 경로, nginx가 참조할 수 있도록 마운트
3. certonly
인증서만 발급하고 웹 서버 설정을 변경하지 않는 옵션
4. --webroot
웹 루트 경로로 인증서를 발급하는 옵션. let's encrypt가 제공한 인증파일을 웹 루트 경로에 배치하고 이 경로에 접근하여 let's encrypt가 서버 소유권을 확인 후 SSL 인증서를 발급함. 이 옵션에서는 nginx가 이미 실행 중이어도 중단하지 않고 인증서를 발급받을 수 있으나, --standalone 방식에서는 자체 도메인 검증을 하고, 그동안 nginx 같은 웹 서버의 포트를 사용할 수 없어 웹 서버가 중단되어져야 한다. 즉, 서버가 실행되는 환경에서는 사용할 수 없다. 또는 --nginx 옵션으로 nginx 플러그인을 통해 인증서 발급도 가능하지만 이 경우에도 서버를 재시작해야 한다.
5. -w
nginx가 제공하는 웹 루트 디렉토리.
6. -d
SSL 인증을 발급받을 도메인 이름

4. nginx 재설정
브라우저에서 접속하면 favicon을 계속 찾아서 portainer의 파비콘도 리다이렉션으로 추가해줬고,
/etc/nginx/html/index.html에 테스트용 html 문서를 작성해줬다.
nginx.conf (컨테이너 간 https 통신 버전)
user nginx;
worker_processes  auto;
error_log  /var/log/nginx/error.log warn;
pid        /var/run/nginx.pid;

events {
    worker_connections 1024;
}

http {
    include       /etc/nginx/mime.types;
    default_type  application/octet-stream;
    sendfile        on;
    keepalive_timeout  65;

    server {
        listen 80;
        server_name yourdomain.com www.yourdomain.com; ## 도메인명

        # HTTP에서 HTTPS로 리다이렉트
        location / {
            return 301 https://$host$request_uri;
        }
    }

    server {
        listen 443 ssl;
        server_name yourdomain.com www.yourdomain.com;  ## 도메인명

        ssl_certificate /etc/letsencrypt/live/yourdomain.com/fullchain.pem;
        ssl_certificate_key /etc/letsencrypt/live/yourdomain.com/privkey.pem;

        location / {
            root /etc/nginx/html;
            index index.html;
        }
    }

    # 서브도메인 (API 서브도메인)
    server {
        listen 80;
        server_name portainer.yourdomain.com;

        # HTTP에서 HTTPS로 리다이렉트
        location / {
            return 301 https://$host$request_uri;
        }

    }

    server {
        listen 443 ssl;
        server_name portainer.yourdomain.com;

        ssl_certificate /etc/letsencrypt/live/portainer.yourdomain.com/fullchain.pem;
        ssl_certificate_key /etc/letsencrypt/live/portainer.yourdomain.com/privkey.pem;

        location / {
            proxy_pass https://portainer:9443;  # 서브도메인에 대한 백엔드 서비스 주소
            proxy_set_header Host $host;
            proxy_set_header X-Real-IP $remote_addr;
            proxy_set_header X-Forwarded-For $proxy_add_x_forwarded_for;
            proxy_set_header X-Forwarded-Proto $scheme;
            # SSL 인증서 검사 비활성화
            proxy_ssl_verify off;
        }

        location /favicon.ico {
            return 301 https://icon.icepanel.io/Technology/svg/Portainer.svg;
        }
    }
}
proxy_pass에서 https로 전달한 후 proxy_ssl_verify off 로 옵션을 단 것이 포인트. 그런데 컨테이너 간 ssl이 굳이 필요없기에 아래의 http 연결 버전으로 적용했다.
nginx.conf (컨테이너 간 http 통신 버전)
user nginx;
worker_processes  auto;
error_log  /var/log/nginx/error.log warn;
pid        /var/run/nginx.pid;

events {
    worker_connections 1024;
}

http {
    include       /etc/nginx/mime.types;
    default_type  application/octet-stream;
    sendfile        on;
    keepalive_timeout  65;

    server {
        listen 80;
        server_name yourdomain.com www.yourdomain.com; ## 도메인명

        # HTTP에서 HTTPS로 리다이렉트
        location / {
            return 301 https://$host$request_uri;
        }
    }

    server {
        listen 443 ssl;
        server_name yourdomain.com www.yourdomain.com;  ## 도메인명

        ssl_certificate /etc/letsencrypt/live/yourdomain.com/fullchain.pem;
        ssl_certificate_key /etc/letsencrypt/live/yourdomain.com/privkey.pem;

        location / {
            root /etc/nginx/html;
            index index.html;
        }
    }

    # 서브도메인 (API 서브도메인)
    server {
        listen 80;
        server_name portainer.yourdomain.com;

        # HTTP에서 HTTPS로 리다이렉트
        location / {
            return 301 https://$host$request_uri;
        }

    }

    server {
        listen 443 ssl;
        server_name portainer.yourdomain.com;

        ssl_certificate /etc/letsencrypt/live/portainer.yourdomain.com/fullchain.pem;
        ssl_certificate_key /etc/letsencrypt/live/portainer.yourdomain.com/privkey.pem;

        location / {
            proxy_pass http://portainer:9000;  # 서브도메인에 대한 백엔드 서비스 주소
            proxy_set_header Host $host;
            proxy_set_header X-Real-IP $remote_addr;
            proxy_set_header X-Forwarded-For $proxy_add_x_forwarded_for;
            proxy_set_header X-Forwarded-Proto $scheme;

        }

        location /favicon.ico {
            return 301 https://icon.icepanel.io/Technology/svg/Portainer.svg;
        }
    }
}
https 옵션 설명
$host: 클라이언트가 요청한 Host 헤더 값입니다. 이는 사용자가 입력한 도메인 이름에 해당하며, 보통 example.com과 같은 도메인이 여기에 포함됩니다. 프록시 요청을 백엔드 서버로 전달할 때 원래 요청의 호스트 정보를 유지하는 데 사용됩니다.
$remote_addr: 클라이언트의 실제 IP 주소입니다. 프록시를 통해 백엔드로 전달될 때 클라이언트의 실제 IP 정보를 전달하기 위해 사용됩니다.
$proxy_add_x_forwarded_for: X-Forwarded-For 헤더에 클라이언트의 IP 주소를 추가하여, 백엔드가 요청자의 원래 IP를 알 수 있도록 합니다. 여러 프록시를 거친 요청일 경우 각 프록시에서 추가된 IP가 나열됩니다.
$scheme: 현재 요청이 HTTP 또는 HTTPS 중 어떤 프로토콜로 들어왔는지를 나타냅니다. 이를 통해 백엔드로 전달할 때 원래 요청의 프로토콜을 알릴 수 있습니다.
$request_uri: Nginx에서 사용되는 변수를 의미하며, 클라이언트가 요청한 URI의 전체 경로를 나타냅니다. 이는 요청의 **쿼리 스트링(query string)**을 포함한, 원래 요청된 URI를 가리킵니다.
ex) $host: example.com , $request_uri: /path/to/resource?user=123&status=active 등
yourdomain.com 과 www.yourdomain.com 부분을 실제 사용할 도메인 이름으로 변경해야 합니다.
ssl_certificate와 ssl_certificate_key 에 있는 경로(/etc/letsencrypt/live/yourdomain.com/)는 실제로 Let’s Encrypt를 사용하여 발급받은 인증서 경로로 변경해야 합니다.
주의사항
*** 여기서 서브도메인의 백엔드 서비스 주소는 nginx 컨테이너 기준에서의 주소로 적어야 한다. 그렇게 적기 위해서 도커 네트워크로 컨테이너의 주소를 배정받아야 한다. ***
5. SSL 갱신 자동화
--rm 옵션을 달아서 certbot 컨테이너는 실행 후 SSL 인증서 발급/갱신 후 바로 제거되기 때문에, 필요할 때마다 certbot 컨테이너를 다시 실행해주는 명령어를 작성해줘야 한다. crontab을 이용하여 주기적으로 실행해주기로 했다.
갱신 스크립트(renew.sh) 작성
docker run --rm --name certbot \
	-v /home/유저명/docker_volumes/nginx:/etc/nginx \
	-v /home/유저명/docker_volumes/certbot/:/etc/letsencrypt \
	certbot/certbot:latest certonly --webroot --force-renewal \
	-w /etc/nginx/html/ \
	--cert-name 도메인명 &&

docker run --rm --name certbot \
	-v /home/유저명/docker_volumes/nginx:/etc/nginx \
	-v /home/유저명/docker_volumes/certbot/:/etc/letsencrypt \
	certbot/certbot:latest certonly --webroot --force-renewal \
	-w /etc/nginx/html/ \
	--cert-name 도메인명 &&

docker exec nginx-container nginx -s reload
/home/유저명/sh/renew.sh
chmod 777 /home/유저명/sh/renew.sh
crontab을 이용해 스크립트 자동 실행 설정
crontab -e

# 매월 1일 4시 59분
59 4 1 * * /home/유저명/sh/renew.sh
crontab -e
* * * * * /path/to/your/command
각 별표의 의미:
첫 번째: 분 (0-59)
두 번째: 시 (0-23)
세 번째: 일 (1-31)
네 번째: 월 (1-12)
다섯 번째: 요일 (0-7) (일요일은 0 또는 7)
참고
HTTP to HTTPS Nginx too many redirects
I have a website running on a LEMP stack. I have enabled cloudflare with the website. I am using the cloudflare flexible SSL certificate for https. When i open the website in chrome it shows website
stackoverflow.com